A 6-hour piece using 80 grams of PLA. How much does it cost you?
If you thought "80 grams at €20 a kilo, €1.60", you've only worked out the material. In a normal workshop, that's a small part of what the piece really costs you.
In a workshop with three printers, with the piece painted and packaged, the full sum is this:
| Material | €1.60 |
| 6 hours of printer time | €5.16 |
| Finish (painted) | €2.00 |
| Extra costs (packaging) | €0.60 |
| Real cost of the piece | €9.36 |
Almost six times as much. The difference isn't a rounding error: it's the rent, the electricity, the wear on the printers, the accountant and the pieces that come out wrong. You pay for all of that; the question is whether you're charging for it.
Here you'll see how to build those expenses into the cost of every piece. You set it up once, and from then on it's applied automatically to every piece you create.
Where that €5.16 comes from
The idea is simple: you add up everything the workshop costs you each month and divide it by the hours you actually print. That gives you what one hour of printer time costs you, and all that's left is to multiply it by the piece's hours.
With the numbers from the example:
- Hours: three printers, ten hours a day, twenty-five days a month → 750 hours.
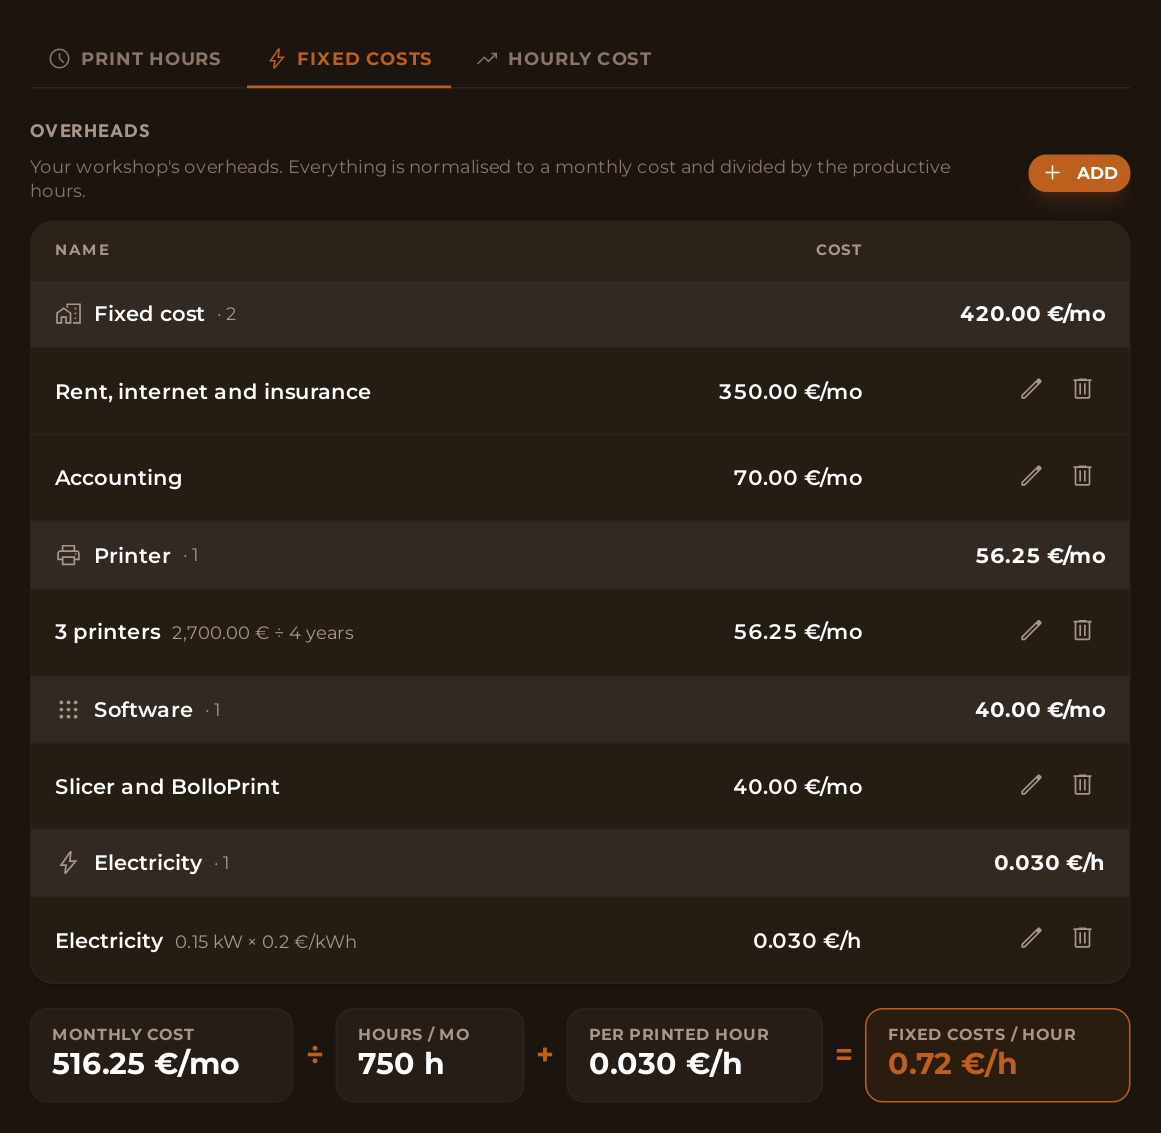
- Expenses: between rent, the accountant, software and the depreciation of the machines, about €516 a month goes out. Spread out: €0.69 an hour. Add electricity, and the fixed costs per hour come to €0.72.
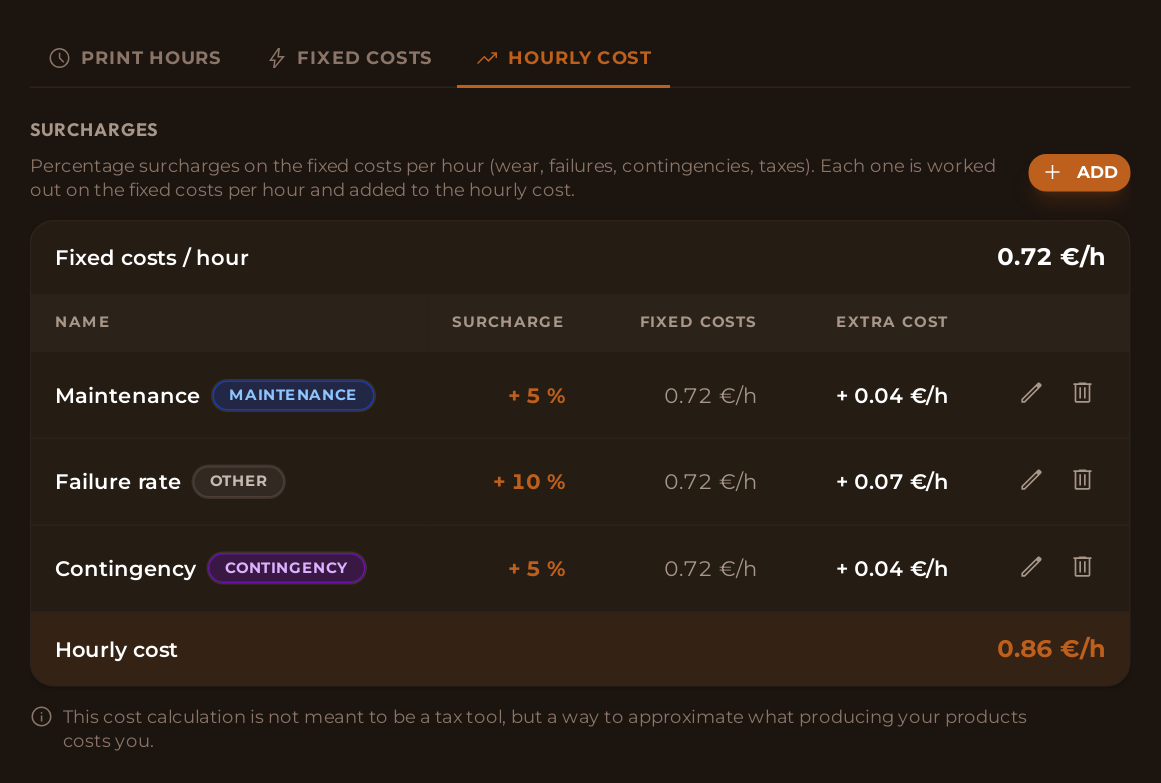
- Surcharges: 5% for maintenance, 10% for failure rate and 5% for contingency take it to €0.86 an hour. For six hours, €5.16.
That's exactly the sum BolloPrint's Costs section does, in Settings → Costs. Only the Owner and Admins can see it.
If you're just getting started, the Work out what each part costs you task in First steps, on the Home page, walks you through these same screens one after another, and ticks each one off in green as soon as you save it.
The hours you really print
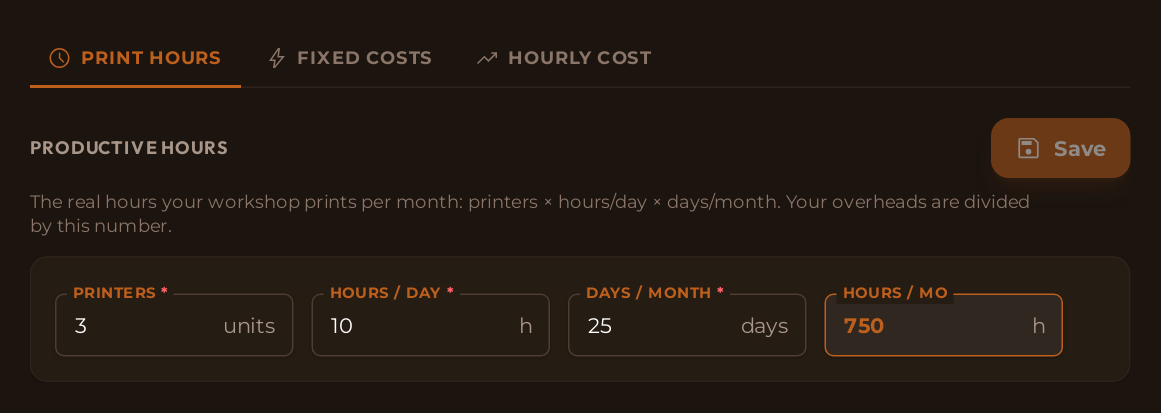
Start with the hours: it's the number most people get wrong, and the one that changes the result the most. It's in Hourly cost → Print hours, and it's three fields:
Printers × Hours / day × Days / month
Enter what really happens, not the theoretical maximum. If you have three printers but on average they work eight hours a day, it's eight. Not twenty-four.
It's tempting to enter a high number, because the higher it is, the cheaper the hour comes out. But you pay those expenses anyway, and whatever you don't spread across your pieces comes out of your own pocket at the end of the month.
What the workshop costs you
With the hours set, it's time to enter your expenses. In the Fixed costs tab you add them one by one; BolloPrint sorts them by type and only asks you for what it needs for each one:
| Type | What you enter |
|---|---|
| Fixed cost | Rent, internet, accountant, insurance… the monthly amount |
| Printer | What it cost you and over how many years you depreciate it |
| Software | The subscription to your slicer, to BolloPrint, to whatever you use |
| Staff costs | The salary and how many people |
| Electricity | The kW one printer uses and what you're charged per kWh |
It doesn't need to be accurate to the cent: a reasonable number today is worth more than the perfect number next year.
⚠️ Don't enter the same expense twice
The monthly amounts describe the whole workshop: rent goes in just once. The ones that go per printed hour — like electricity by usage — describe a single printer: there, put what an average machine uses, not the whole unit.
Right at the bottom you have the sum worked out, the same one as at the start:
monthly expenses ÷ your print hours = what one hour costs you "before extras"
Those are your fixed costs per hour: €0.72 in the example.
What you know is going to happen
Fixed costs leave out whatever happens without a fixed bill: nozzles break, and some pieces come out wrong and have to be reprinted.
That's what the Hourly cost tab is for: it adds a few percentages to the fixed costs per hour — maintenance, failure rate and contingency.
The failure rate is the most important one, and the one most people skip. If one in every ten pieces ends up in the bin, the nine good ones are paying for the bad one. If you don't include it here, you pay for it yourself.
The result is your hourly cost: €0.86 in the example. That's your real number, and it's the one applied to every piece.
💡 Your profit margin doesn't go here
Only costs go here. How much you want to earn is decided later, on the product, because it's a business decision.
Material and extras
That leaves the simplest part, in Default values:
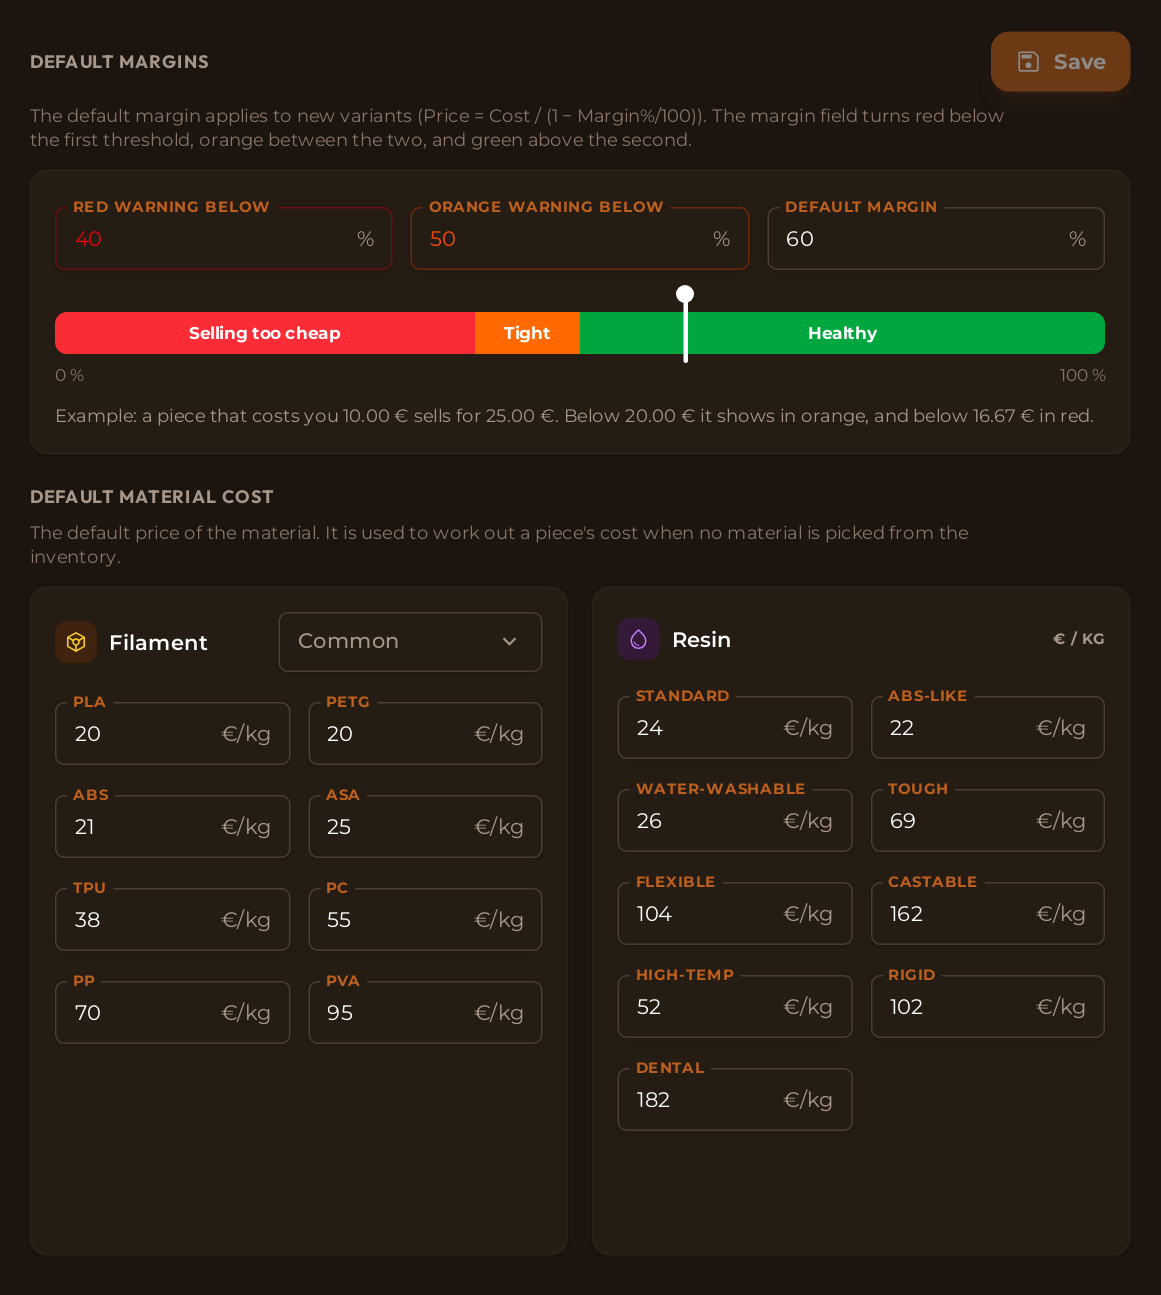
- The price of each material, per kilo. It's per type, not per family: PLA and TPU don't cost the same.
- Finishes: how much you add on if the piece is post-processed or painted.
- Extra costs: packaging, fixings, magnets, inserts, labour. For each one you choose whether it's charged per unit or per build plate.
- Margins: your default one, and the percentage below which we warn you in red or in orange.
💡 If the material is in your inventory, the inventory wins
These prices are a reference, for when there's nothing behind them. If the piece comes from a spool you've registered with its real cost, we use that one.
And this is how it reaches your piece
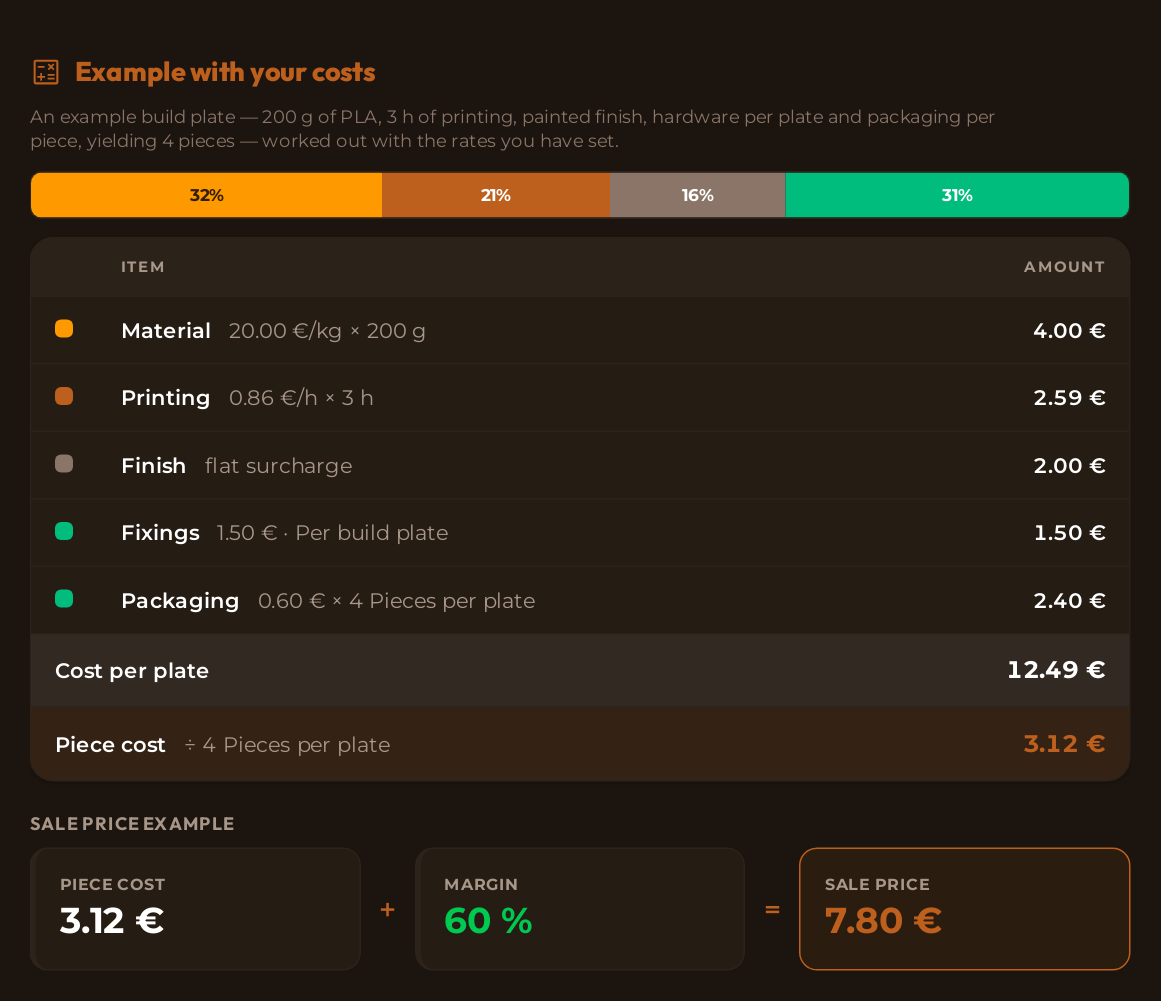
The four previous steps end up in a single number: what one hour of printer time costs you. From there, every piece is a sum:
its hours × your cost per hour + the material it uses + the finish, if it's post-processed or painted + any extra costs you add to it
There's one detail worth understanding, because it explains why it pays to fill the bed: the sum is done per build plate, not per piece. BolloPrint works out what the whole plate costs and splits it between the pieces that come off it. That's why, among the extra costs, the ones you mark per build plate are charged just once — whether you print the pieces one at a time or twenty at a time — and the per unit ones are charged on every piece.
What's more, every piece keeps the cost per hour it was calculated with. That's deliberate: it means the cost of what you printed last year stays what it was back then. It's also why there's a Recalculate button, a little further down.
Now you've got your number
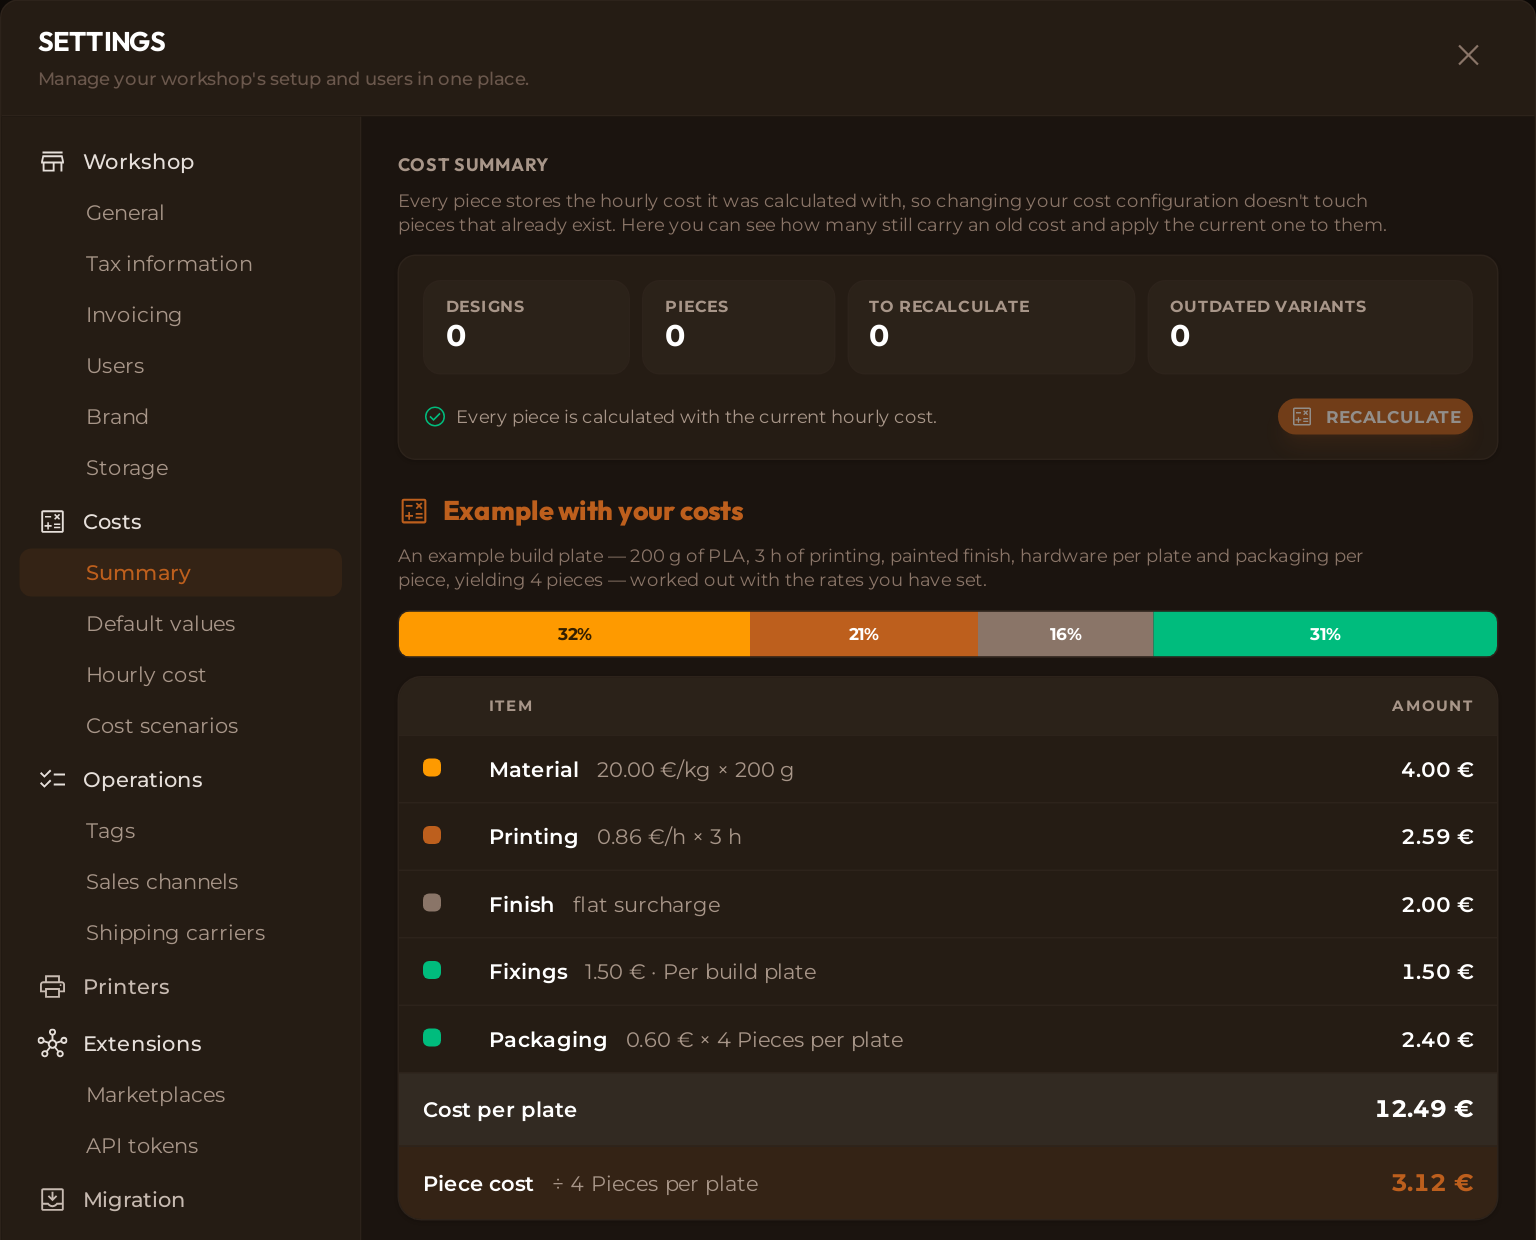
To see the result, go to Costs → Summary. The Example block takes a sample plate and shows you the whole sum with your values: how much is material, how much is printing, how much is finish and what the piece comes to.
When your expenses change
Your numbers won't always stay the same: electricity goes up, you buy another printer or you move premises. When you update them, the pieces you already had don't change on their own. That's deliberate: every piece keeps the cost it was calculated with, and you wouldn't want the cost of everything you made last year rewritten.
When you want to apply it to everything, in Summary you have a counter of pieces to recalculate and the Recalculate button. You decide when.
💡 It doesn't touch your sale prices
Recalculating updates the cost and the suggested price. The one you set by hand stays as it is. What you'll see move is the margin indicator.
Should I buy another printer?
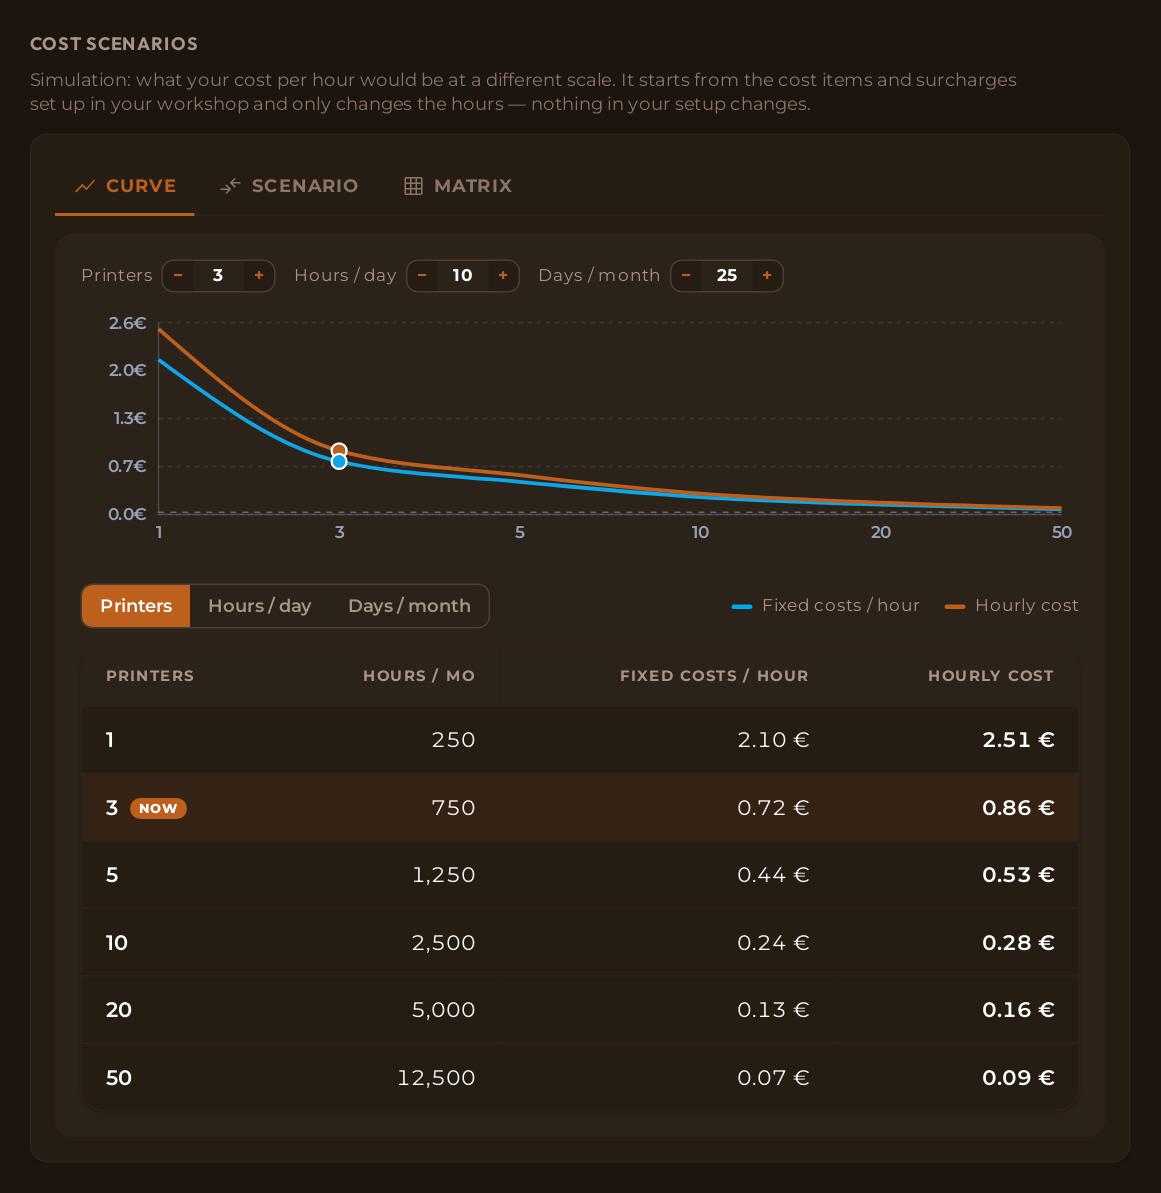
With your costs set up, you can answer this question with numbers. In Cost scenarios you change the printers, the hours or the days and see what would happen to your cost per hour. It only simulates: nothing in your setup changes.
What it shows best is that the curve stops going down. Going from one printer to five divides the cost per hour by almost five. Going from twenty to a hundred barely moves it, because there are expenses — like electricity — that you pay for every printed hour and that don't get shared out at all.
Setting it up takes four screens and part of an afternoon. In return, every piece you create will come with its real cost, and you'll know whether you're making money without doing the sums by hand.
💡 Want a hand with your numbers?
If you don't know where to start, write to us from the contact page or on our Discord. We've done this a fair few times already.
May your numbers always add up.

Related documentation
- Costs: the full reference for the section
- Pieces: how the cost of each piece is calculated
- Products and Variants: from cost to sale price
- Inventory: so the material comes from its real cost