Your printers are in the workshop, but you aren't always. And to know whether one is still printing, whether it came out right or whether it has material left, you have to be standing in front of it.
That's what the local agent is for: a small program that runs on a computer in your workshop, talks to your printers over your own network and tells BolloPrint what it sees.
- You don't touch the router: no open ports, no fixed IP, no firewall.
- It's very lightweight: any computer you already have switched on will do.
- One is enough for the whole fleet, whatever its size.
- It updates itself: when a new version comes out, it installs it on its own.
Where to install it
The agent lives on any computer in the workshop that you don't switch off: a NAS, a mini-PC, a Raspberry Pi or the workshop PC. It only needs to be always on and to have Docker.
Ideally it should be on the same network as the printers, because then it finds them by itself. If that isn't possible, you add them by hand and they work just the same.
Create the agent in BolloPrint
Start in BolloPrint. Go to Settings → Printers. You'll see three tabs: Printers (all your machines, however they're connected), Local agent and Bambu Cloud. Open Local agent and click New agent.
Give it a name that will still mean something to you in six months: name it after where it is, not what it is. "Ground floor" or "Unit 2" work; "Agent 1" doesn't. Then click Create agent.
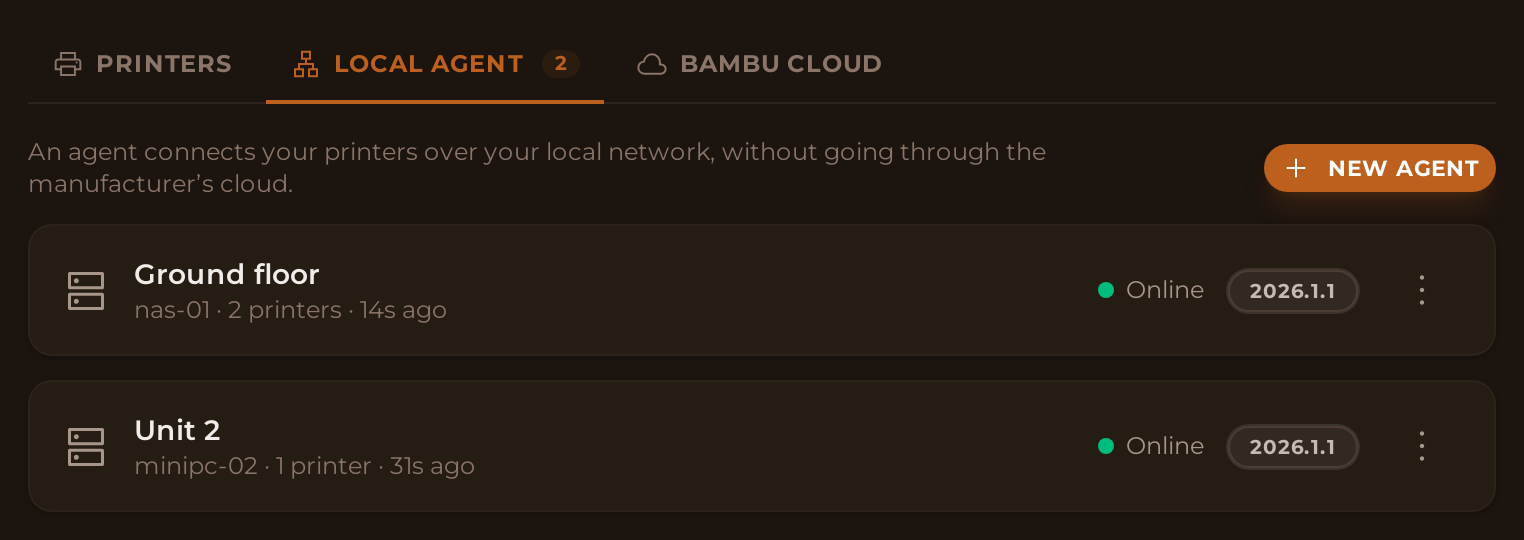
Copy the manifest
When you create it, BolloPrint shows you a manifest: a piece of text with everything of yours already filled in, your agent's keys and the right version. There's nothing to replace or fill out.
Choose the format you use (Docker Compose is the usual one), click Copy and, once it's somewhere safe, Save.
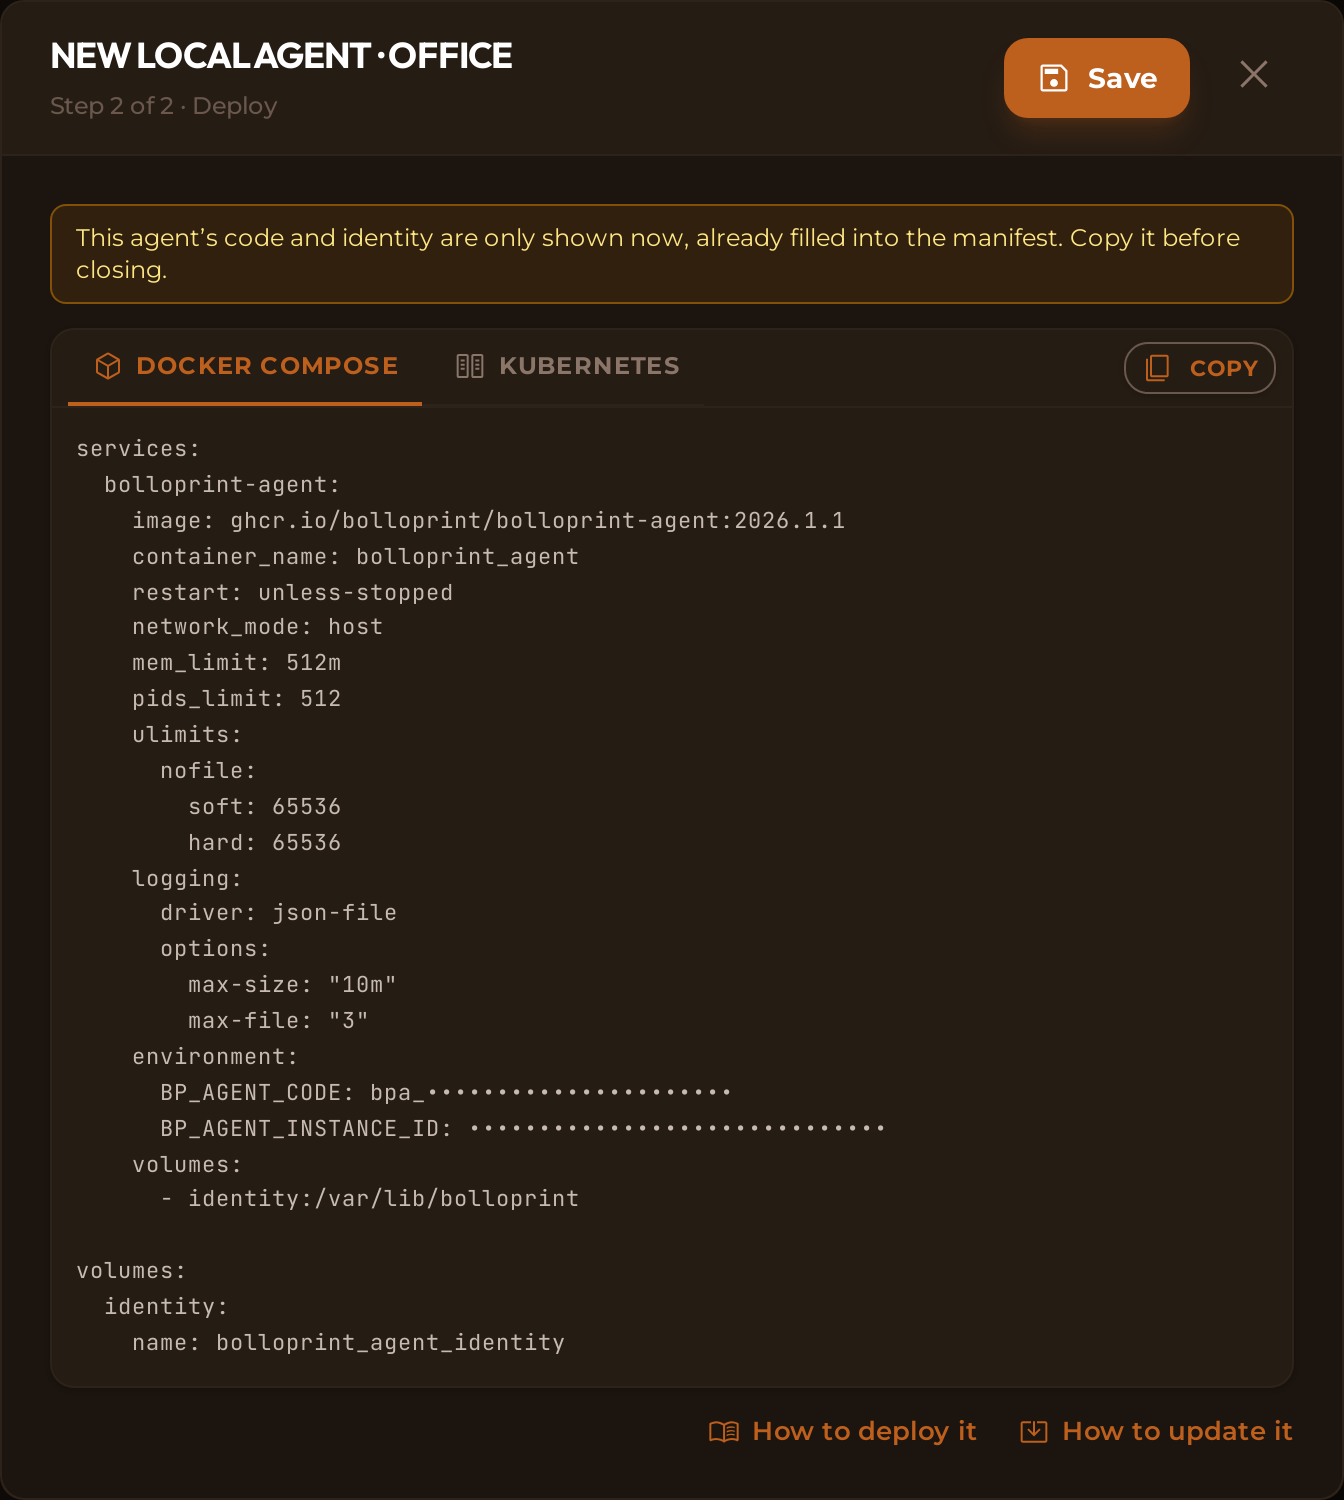
🔐 Copy it now: the keys are only shown once
We don't store them, so we can't show them to you again. If you lose the manifest, no harm done: open the agent with Edit (in its ⋮ menu), go to the Deployment tab and click Regenerate keys. If it has never connected, nothing gets cut off.
Paste the manifest on your computer
This part happens on your computer, not in BolloPrint, and depends on where you install it:
- Synology NAS: install Container Manager from the Package Center, go to Project → Create, paste the manifest and create it. No commands to type.
- Windows or Mac: install Docker Desktop, save the manifest in a folder as
docker-compose.ymland, from that folder, rundocker compose up -d. - Linux: install Docker with your distribution's package manager, save the
manifest as
docker-compose.ymland rundocker compose up -dthere. - Portainer: paste the same manifest into a stack and deploy it.
💡 On Windows and Mac, printers aren't discovered on their own
There, Docker runs inside a virtual machine, which can't see the announcements printers send out on your network. The agent works just the same, but you add the printers yourself, as explained further down.
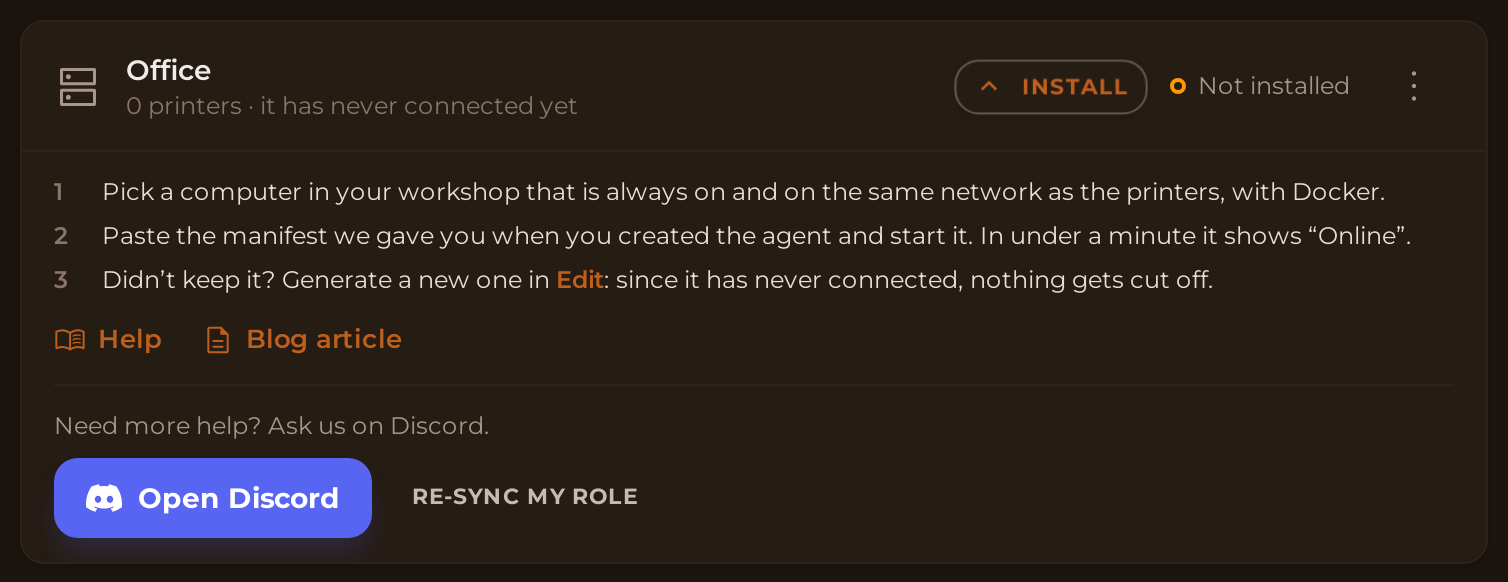
Stuck? Click "Install"
Until the agent has connected at least once, its row says Not installed. That isn't an error: nothing has gone down, it just hasn't been installed yet.
On that same row there's an Install button. Click it and you get the steps you've just read, in short, with a link to the Help, another to this Blog article and a button to ask us on Discord. If you didn't keep the manifest, step 3 takes you straight to generating a new one.
Check that it's online
Go back to BolloPrint: in less than a minute, the agent switches to Online, showing the name of the computer it runs on and the version it's on.

If it doesn't, it's almost always one of three causes: the manifest was only half pasted, the computer has no internet or a firewall is blocking outgoing traffic. If you want to see what the agent itself reports, open it with Edit: the Status tab has the details.
Your printers show up on their own
From then on, the agent looks for printers on your network by itself every 15 minutes. When it finds one, you get a notice above the tabs and you'll see it at the bottom of Printers on the local network, with its brand and model. You decide:
- Add: you register it and it starts reporting.
- Ignore: it isn't yours or you don't want it here.
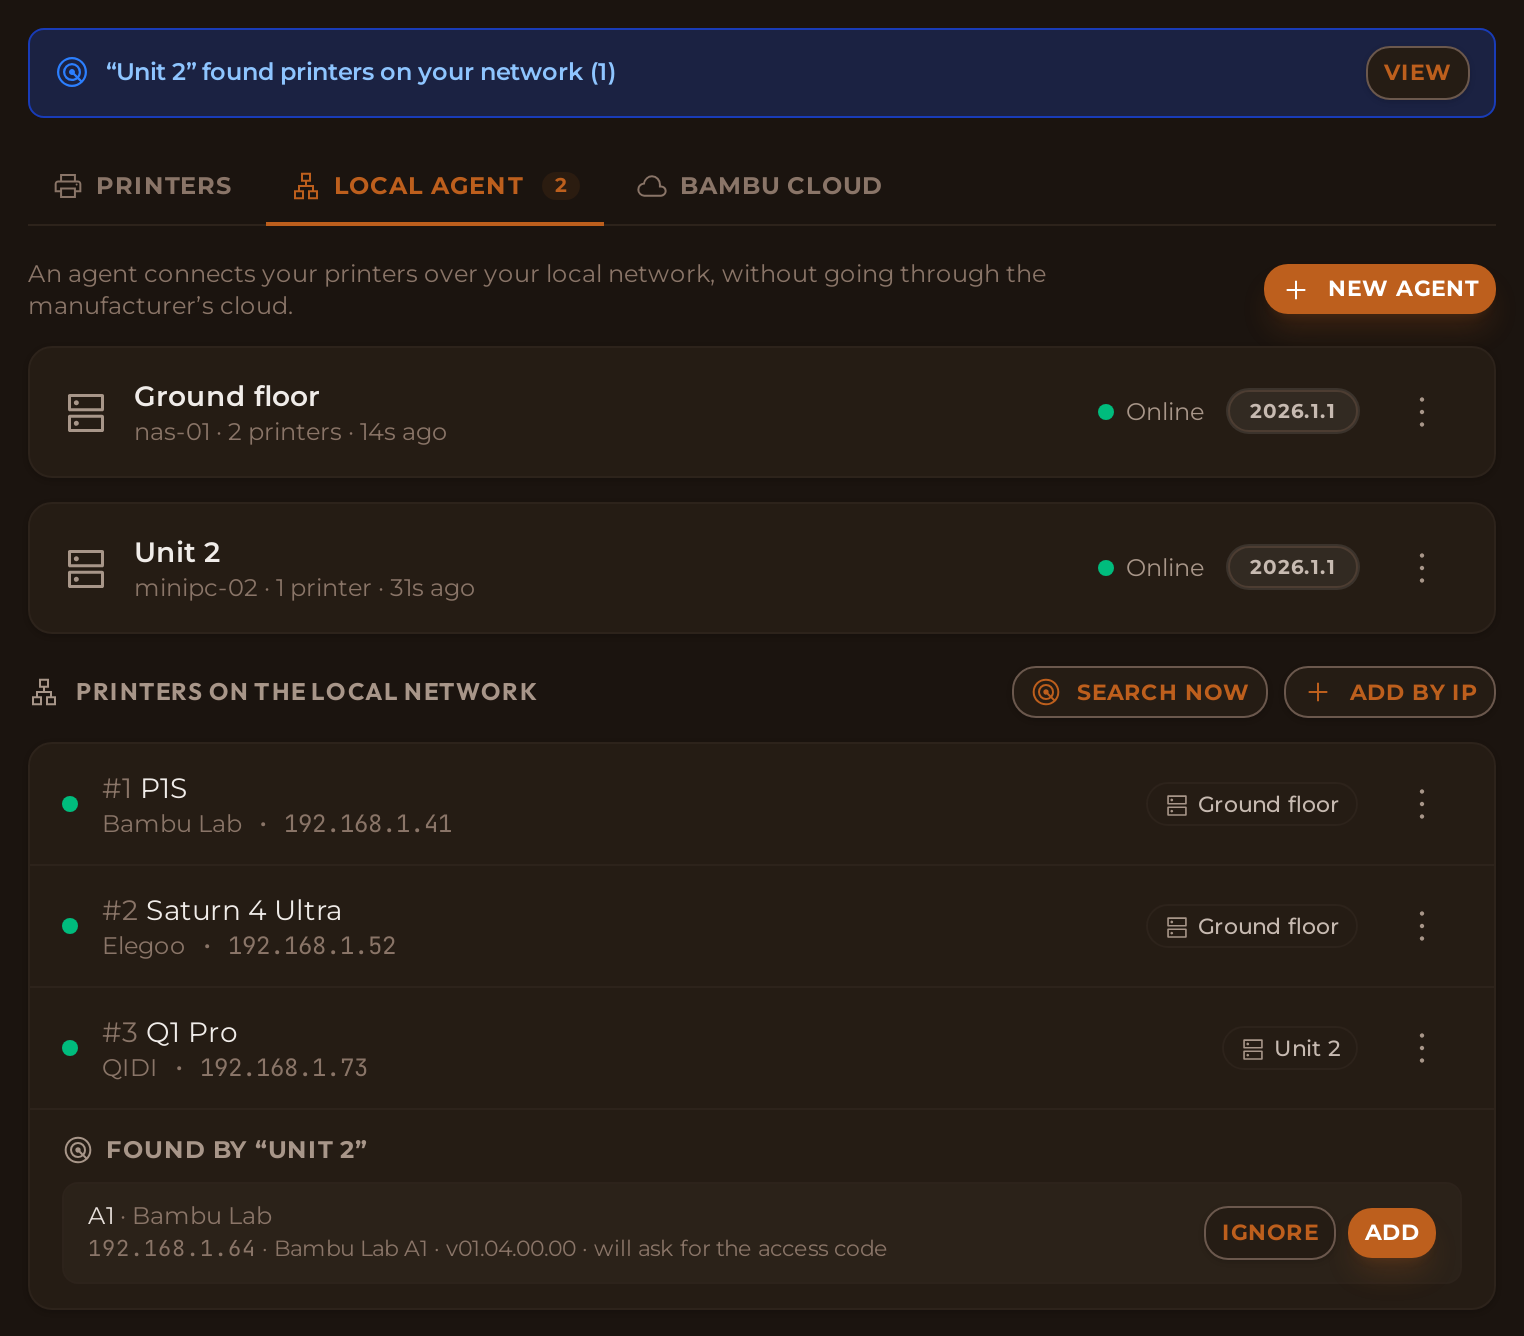
If you've just switched a machine on and don't want to wait, click Search now. If a printer is going to ask you for a code, its row tells you in advance ("will ask for the access code"), so you can have it to hand.
If one doesn't show up, add it yourself
It's normal for a printer not to appear on its own in two cases:
- It's on another network. Printers' announcements don't cross from one network to another.
- The agent runs on Windows or Mac. Docker runs in a virtual machine there.
You don't lose anything because of it: you add it yourself and it works exactly the same, with camera and controls if that machine has them. Click Add by IP. It takes three steps.
1. Choose the brand
Pick your printer's brand: each one has its own card, and the ones with a logo come first. You don't need to know how your machine talks; we take care of that. If you pick Elegoo, we ask Which Elegoo do you have?, because it has several families. Klipper and Other resin printer (ChituBox) are at the end, under Generic, for a self-built machine or a brand that isn't on the list.
If you're not sure your model is supported, there's Not sure? See the list of compatible printers at the bottom; and if your printer isn't there, tell us on Discord.
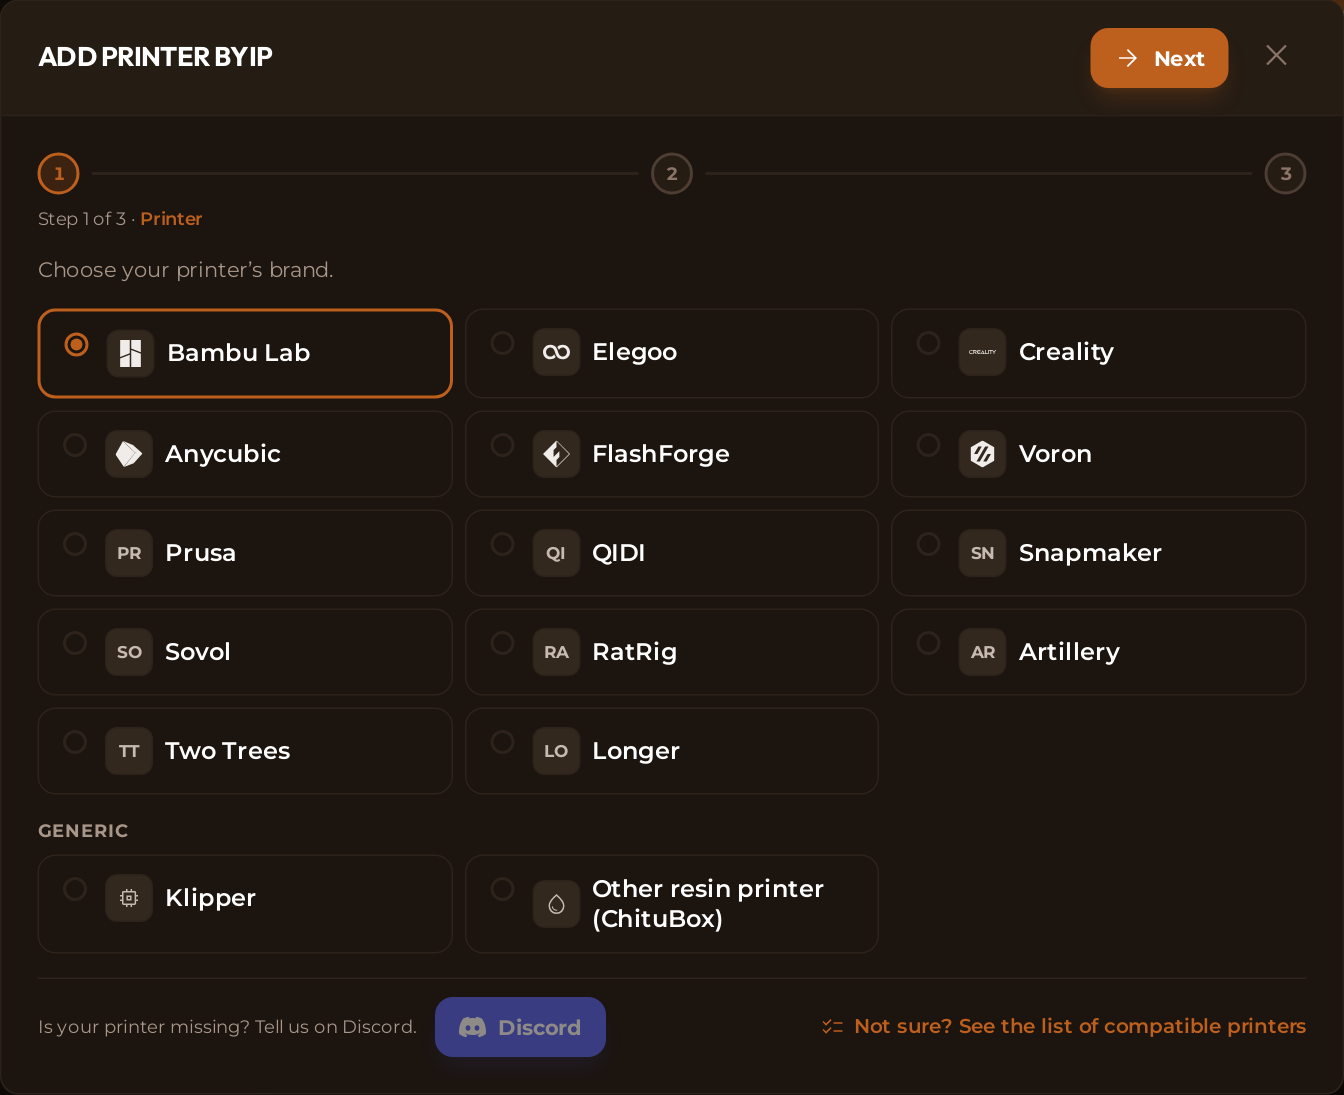
2. Enter its details
Only what's essential:
- Which agent connects it?, if you have more than one. You can only pick one that's online.
- Printer IP. You'll find it on the printer's screen (Settings → Network) or in your router.
- The printer's code, if that brand asks for one. The field is named the way the manufacturer names it: on a Bambu, LAN access code.
- Name, if you want to give it one of your own. It's optional.
You don't type the model or the serial number: the agent asks the printer for them. Required fields have a red asterisk and are outlined in red while they're empty. At the bottom, the Remember box tells you what to get ready on that brand before connecting.
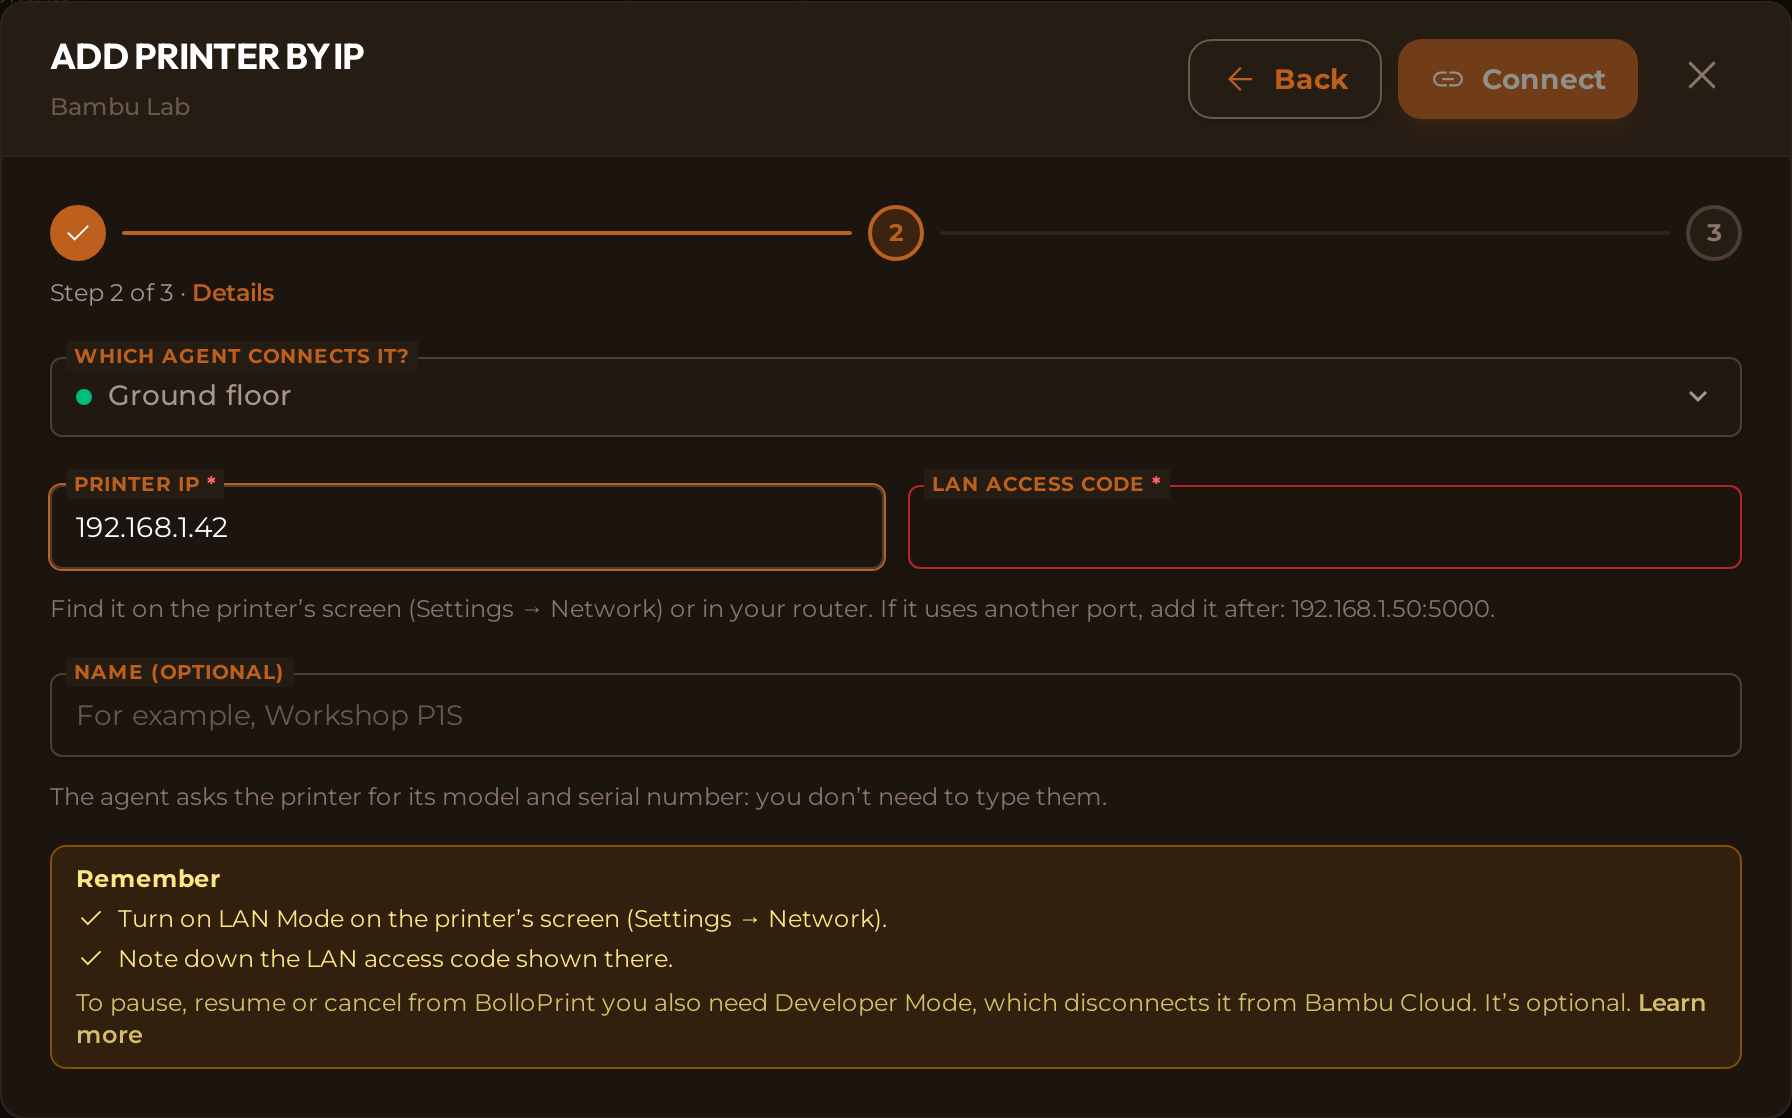
3. Connect
Click Connect and you'll see it progress: the agent receives the request, looks for the printer at that address and connects to it. When it's done, you'll see "Connected. It's now in your printer list."
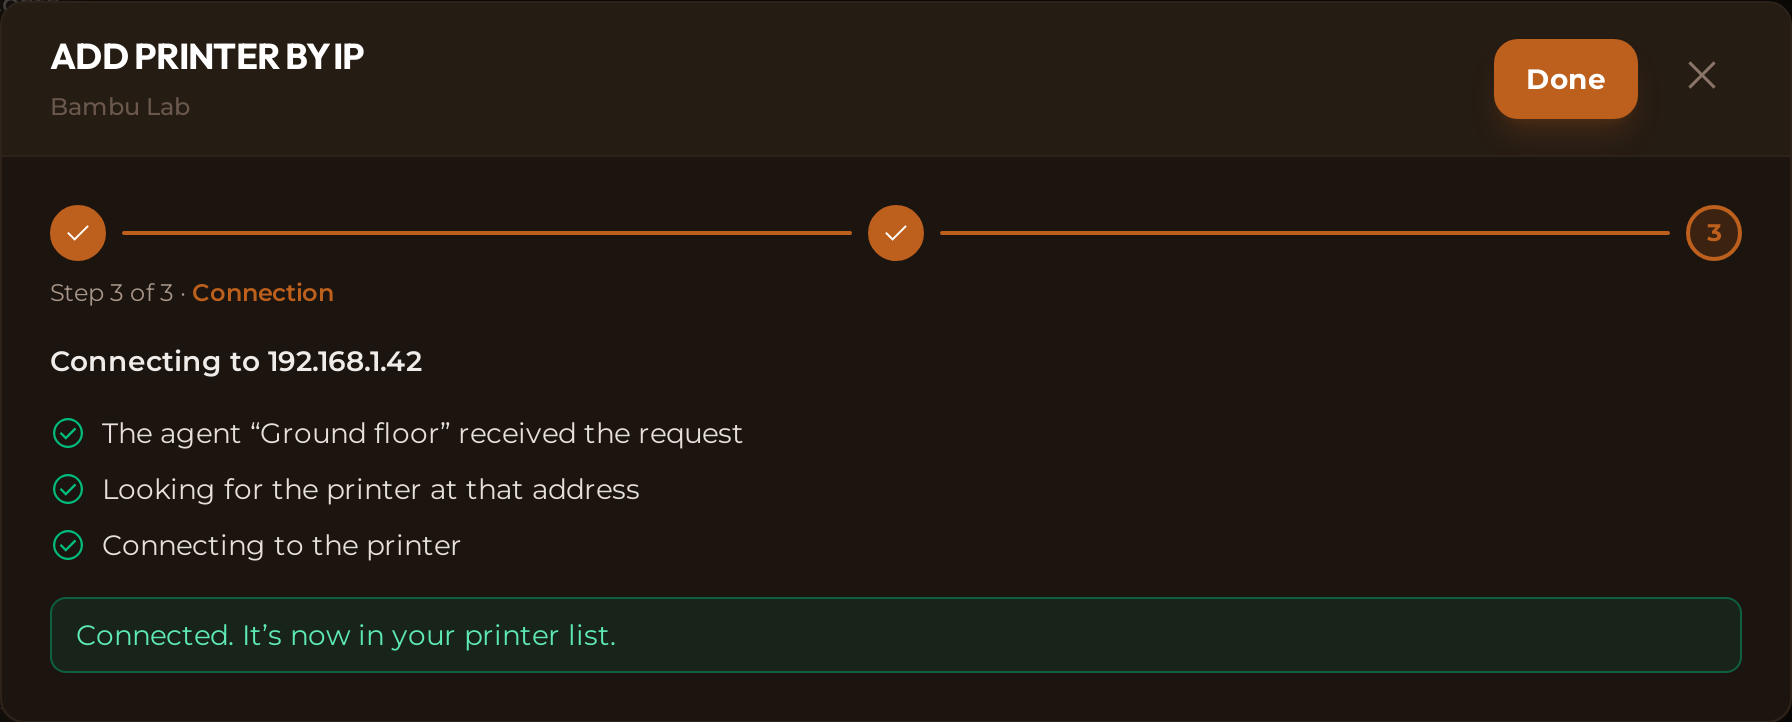
If something goes wrong, we tell you in plain words: what's happening and what to check (nothing answering at that IP, the printer rejecting the code…). With Back you fix the detail and try again. The printer's original message is folded away under Show technical detail: if you write to us, copy that in and we'll get to the bottom of it sooner.
💡 Reserve its IP in the router
If the router changes a printer's address, we find it again on our own, but it'll be down for a while. Reserving its address avoids that gap. It's a router setting, not a BolloPrint one.
What each brand asks of you
This is where most questions come up. It's the same as the reminder in step 2, in short:
| Brand | What you have to do on the machine | Camera | Can you pause and cancel? |
|---|---|---|---|
| Bambu Lab | Turn on LAN Mode on its screen (Settings → Network) and use the LAN access code it shows you | Yes | Yes, if you also turn on Developer Mode |
| Prusa (beta: MK4, MK3.5, MK3.9, MINI, XL, CORE One) | Turn on PrusaLink and use the password it shows (not your Prusa Connect one) | No | Yes |
| Elegoo (Saturn, Mars, Jupiter, Centauri Carbon) and other resin printers (ChituBox) | Nothing, they don't ask for a password | On the models that have one | Yes |
| Elegoo Centauri Carbon 2 | Nothing; only if you set a code on its screen, enter it | Yes | No |
| Anycubic (beta: Kobra 3, Kobra S1, Kobra 4, Kobra X) | Turn on LAN Mode (Settings → Network). With it on, the printer stops using Anycubic's cloud and app | No | No |
| FlashForge (beta: Adventurer 5M, 5M Pro, AD5X, Creator 5) | Turn on LAN Only and use the check code from its network menu | Yes | No |
| Snapmaker (U1) | Nothing | Yes | Yes |
| Klipper (QIDI, Sovol, Voron, RatRig, Creality K1…) | Usually nothing: only if you set an API key in Moonraker | Yes, if you have a webcam on your Klipper | Yes |
⚠️ Bambu Lab: the access code changes
Every time you turn LAN Mode or Developer Mode on or off, Bambu generates a new code. If a Bambu that was working fine suddenly stops connecting, nine times out of ten this is why: check the code on its screen again and update it in BolloPrint. And bear in mind that Developer Mode disconnects it from Bambu Cloud: from then on you'll only see it through the agent.
💡 Can't find your model in the table?
Check compatible printers. If it runs Klipper inside (any self-built or modified machine), it's supported even if the brand doesn't appear on any list.
What you get with the local agent
With the agent up and running, you get:
- Almost every brand: Bambu Lab, Prusa, Elegoo, Anycubic, FlashForge, Snapmaker and anything running Klipper. The cloud doesn't offer this, as it only exists for Bambu Lab.
- Camera: live while you have the page open, a photo whenever you like and a final photo saved in the history of every print. It isn't video surveillance: nothing is recorded.
- Controls: pause, resume and cancel from BolloPrint, without walking over to the machine, on the ones that allow it (see the table above). On Bambu Lab, with the printer in LAN Mode and Developer Mode.
- Resilience to internet outages: if your line goes down, the agent keeps reading the printers and stores what happens. When the connection is back it sends everything, and you don't lose those hours of history.
- Independence from the manufacturer, and from their cloud staying up.
What no route allows is sending jobs to print: you still send the file from your slicer.
Frequently asked questions
The questions we get asked most.
Do I have to open ports on the router?
No. No ports, no fixed IP, no firewall rules. It works behind a normal home router.
Do I need one agent per printer?
No. A single one handles the whole fleet. It only makes sense to have several if you have two premises or two separate networks. In that case, Add by IP asks you which one connects the printer.
What happens if I switch the computer off or a new version comes out?
When you switch it back on, the agent comes back by itself. It also updates itself: when a new version comes out, it downloads it and restarts with it, without you touching the manifest. You'll only have to do something if we tell you on screen.
Why can't I click "Add by IP"?
Because none of your agents is connected, and the text under the button says so. If you haven't installed it yet, use Install on its row; if it was already working, check that the computer is on and has internet.
💡 Need help?
Write to us from the contact page or open a thread on our Discord. If you tell us which printers you have, we'll tell you exactly what to do with each one.
Enjoy having your whole fleet in view, wherever you are.
Related documentation
- Connecting printers: the two routes and which one suits you
- The local agent: the full reference
- Deploying the agent: the technical detail, if you need it
- Connection types: what each printer family allows
- Compatible printers: look up your model here